To avoid these ads,狗万10万提款

What did you do "IN" your garage today?

N

nadogail

Well-known member
Joined
Jan 23, 2009
Messages
12,528
地点
Coronado, CA
With a 4.5 inch grinder, made a free hand angled cut on 3" schedule 80 pipe and welded it together at a 90 degree angle using 7014 electrode. This was the first welding I have done in a couple of years, the welds are not pretty but they will be covered with refractory.

Felt good to have my hood on and a stinger in my hand.
To avoid these ads,狗万10万提款
smackey05

smackey05

Well-known member
Joined
2009年10月21日
Messages
289
地点
马萨诸塞州
Finished the sled and got ready to put it back in the trailer.... Then I bought some more parts... I ended up buying a RideLite which alerts riders in the opposite direction if I am the first, or only person in the group riding.

It'll make it back to the trailer one day!

EF0A1929.JPG
zmotorsports

zmotorsports

ALLIANCE MEMBER
Joined
2009年10月20日
Messages
13,218
地点
犹他州北部
Drug the snow thrower over from the shed and started looking it over for winter

I need to get my snowblower ready. Time is a ticking and I've been so busy on side jobs I haven't taken the time to get my snowblower ready for the first storm. I know I need to build up my wear skids as they are showing heavy wear. I should probably just get it into the shop then it will be easier to work on when I get a few minutes here and there.
Kevkx125

Kevkx125

Well-known member
Joined
Dec 26, 2013
Messages
2,642
地点
DOUGLASSVILLE, PA
I need to get my snowblower ready. Time is a ticking and I've been so busy on side jobs I haven't taken the time to get my snowblower ready for the first storm. I know I need to build up my wear skids as they are showing heavy wear. I should probably just get it into the shop then it will be easier to work on when I get a few minutes here and there.
I hear you, that's what I figured too as long as it was in the shop I would get to it.
Zebedeewesty

Zebedeewesty

Well-known member
Joined
May 31, 2013
Messages
529
地点
英国威尔士
My 1970 Beetle failed it MOT today on a worn tie rod end.
Managed to break the end off my balljoint splitter (again:rolleyes:) and my pickle fork splitter is too big to do tie rods and this sucka is seized in good and proper.:疯狂的:
我给它很好地浸泡了Plusgas穿透油,因此明天将重试。没有足够的空间来吸引几个锤子,我也可以给它一个爱。接下来,如果它仍然不转移,则接下来是较接近的,尽管另一个拉杆端紧密,我不想在那个橡胶上涂上橡胶。
在我的零件中,藏匿处只能为68型型号生产出来,所以我不得不在线购买,直到星期五才能到达。
Kevkx125

Kevkx125

Well-known member
Joined
Dec 26, 2013
Messages
2,642
地点
DOUGLASSVILLE, PA
Sanded and polished the headlites on the d/d, better but no where near "like new"

before after

Attachments

  • GEDC0857.JPG
    GEDC0857.JPG
    180.8 KB · Views: 71
  • GEDC0858.JPG
    GEDC0858.JPG
    200.3 KB · Views: 52
  • GEDC0859.JPG
    GEDC0859.JPG
    212.7 KB · Views: 44
  • GEDC0860.JPG
    GEDC0860.JPG
    180.9 KB·视图:59
Forgottonia

Forgottonia

Well-known member
Joined
Apr 20, 2021
Messages
529
地点
edge of Forgottonia
我正在为附属于商店外墙的空气压缩机建造一个小围栏。我计划将某种声音阻尼材料放在墙壁上。该死的东西很大。
Arne73

Arne73

Well-known member
Joined
2010年3月20日
Messages
970
我的拖拉机甲板上的季节性互换了,吹雪机了。然后重新排列车库,将割草设备放在后面,在前面清除降雪,仍然能够完成工作。
Did it.
kaymccampbell

kaymccampbell

Well-known member
Joined
2015年2月27日
Messages
12,474
地点
Upstate New York
搁置我的4个成品胎面以硬化。处理并粘上下一个3.将它们放入夹具中。
以为我可以做最后一个,但事实证明,胎面将要求我从根本上修改模板,直到胶变硬,我才能做到这一点夹具。
Stay tuned.
jshillin

jshillin

Well-known member
Joined
Nov 9, 2008
Messages
4,208
地点
PA
Sanded and polished the headlites on the d/d, better but no where near "like new"

before after
You made good process, but you need to do more sanding. Sometimes you have to start as low as 400 and work up in increments. If they aren't bad, you can start at 600 or 800, then work your way up to 2500 or 3000 before polishing.
R

rayra

Well-known member
Joined
Dec 1, 2014
Messages
1,299
地点
Escaped from Los Angeles
Just making fresh messes in my garage, as I have commenced the installation of all the pergola / pillar parts I've been working on (since July)

Attachments

  • random mess 211116.jpg
    random mess 211116.jpg
    88.1 KB · Views: 52
  • Sparta Pergola Pillar安装02个基地。JPG
    Sparta Pergola Pillar安装02个基地。JPG
    59.5 KB · Views: 50
  • sparta pergola pillar install 01 bases installed.jpg
    sparta pergola pillar install 01 bases installed.jpg
    56.4 kb·视图:47
  • sparta pergola帖子10.JPG
    sparta pergola帖子10.JPG
    71.4 KB · Views: 47
  • sparta pergola posts 12 oiled.jpg
    sparta pergola posts 12 oiled.jpg
    71.7 kb·视图:46
  • sparta columns 93 pillar post sections.jpg
    sparta columns 93 pillar post sections.jpg
    103.1 KB · Views: 48
To avoid these ads,狗万10万提款
Beelzeboss

Beelzeboss

Active member
Joined
Jul 31, 2020
Messages
33
地点
Sydney
Attached some UHMWPE plastic slider plates to the underside of my old safe to allow it to slide on the carpet/floor without damage. The safe is roughly 450x400 and I was able to get 4 plates of 200x200x10. I drilled and tapped 4 x M5 holes per plate (unfortunately no pics, I was too excited to get it done) and fitted the sliders with countersunk M5 socket head screws.

51687697474_4E0E40DBD3_C.JPG

Likely not it's final resting place, but it's in the house.

51687919060_9943ccfc75_c.jpg

Now I just need to figure out how to finish the inside as a drinks cabinet. I'm thinking a glass bottom and/or back, maybe some LED's up top with the electronics in one of the money draws...
Dan in Pasadena

Dan in Pasadena

Well-known member
Joined
Feb 18, 2009
Messages
8,797
地点
Pasadena, CA
经过大量的拖延,我拆开了(曾经是)好鸟喂食器,我的母亲和姐妹几年前给我买了我。太阳击败了地狱。忘了拍“之前”照片,但至少我有一些过程。

打磨了两块木头和金属零件。将金属喷涂为rustoleum青铜,并用多合一的污渍和poly饰面进行木材。将实际种子保持在第2步的零件。它是相同的木材和铜板。我想我会抛光铜,也许会透明它,以持续一段时间。多年来,它已经老化,但没有发展出漂亮的绿色古铜色。

tempImageF3QgtE.png tempImagexGf8Nh.jpg
nuttsgt

nuttsgt

Super Moderator
Staff member
Joined
2009年9月14日
Messages
38,329
地点
俄亥俄州北部
Put the bucket on the FEL to scoop up another dead deer in front of the house.

用柴油挤满了几个挤压瓶。
kaymccampbell

kaymccampbell

Well-known member
Joined
2015年2月27日
Messages
12,474
地点
Upstate New York
追踪并粗暴地弄清楚了接下来的3个胎面。使旧图案进入顶部胎面图案。将其切割,连接并粘在一起。这个胎面不像其他人。它不是3或4个平方板粘在一个街区中,然后切出。前沿和后边缘板都有两个角度,然后有一个三角形填充了一半的长度。然后,一端有一点标签可以填充栏杆,然后捕获一些修剪。这是必须一口气完成成品角度的交易之一。与刨床和桑德(Sander)一起完成的尺寸没有偷偷摸摸。Lota乐趣。 Made the matching piece of big oak for the other half of the landing.
jshillin

jshillin

Well-known member
Joined
Nov 9, 2008
Messages
4,208
地点
PA
Changed the oil in the wife's car for the 1st time. It's a '21 Kia Soul, I'm glad that they put access holes in the belly pan to allow access to the drain plug and oil filter as I hate removing the belly pans to change the oil like on my WRX. I cleaned up under the hood, added washer fluid and checked it over. I went ahead and vacuumed it out and dressed all of the interior plastic. I was going to wash it, but it's supposed to rain tomorrow. It was nice spending a little time in the garage.
P

庞培

Active member
Joined
2021年5月25日
Messages
44
Yesterday a buddy took me to Harbor Freight and we picked up two 44 inch US General rolling tool cabinets and a 26 inch cabinet. We got them off the collapsing pallets and into the garage. Today was spent cleaning up all the packing materials and installing a replacement contactor for the external thermostat for my soon to arrive ( I hope) King 10kW garage heater.


明天我要切下6 x 6胶合板的垫片,并在26英寸和44英寸柜子的轮子下进行并排安装。我正在尝试将它们升级,并使它们俩都处于相同的高度。我的车库地板似乎有一个斜坡,我需要在26英寸橱柜的LHS轮毂下进行1/2英寸的垫片,以使其水平。44英寸的机柜比26英寸的机柜低约1/4英寸,因此在RHS轮毂下需要3/4英寸的垫片和LHS车轮下方的1英寸垫片。
ZRX61

ZRX61

Well-known member
Joined
2006年8月15日
Messages
21,706
地点
Solar Blight Valley, SoCal
Stepped over all the crap removed from the bathroom/closet/bedroom etc during the tear out to fix the water leak. Entire house is custom oak so it was necessary to save the bathroom vanity.. which is now blocking my Kawasaki in the garage when the Camaro is also in there.
Now I need to remove one side of the vanity (MDF) case & the middle support as they are water damaged. Will probably replace with 3/4 ply.
555

555

Well-known member
Joined
Nov 10, 2007
Messages
1,363
地点
Nomad-Arkansas & Georgia
I donated my Desert Storm/Shield uniforms & equipment to the Army AMEDD Museum at Fort Sam Houston. The staff was especially excited and grateful for the old version chocolate chip DCUs as they didn't have a single set in the inventory.
Went through some stuff for a possible donation to Motts Military Museum.kimg1511.jpg

在我的旧火头盔下,是科威特的完整军事地图。它是由几张不同的地图纸制成的。在沙漠风暴中实际使用的平民手中可能没有多少。
R

rayra

Well-known member
Joined
Dec 1, 2014
Messages
1,299
地点
Escaped from Los Angeles
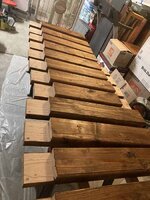
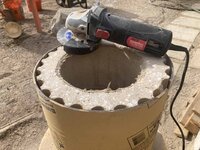
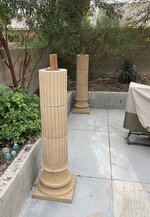
Did some concrete grinding, getting some more concrete pillar parts stacked. About to sharpen some pruning shears and get busy ahead of trash pickup day.
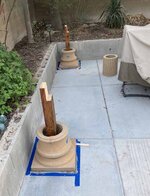
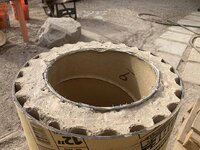
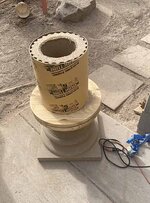
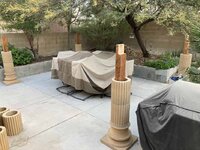
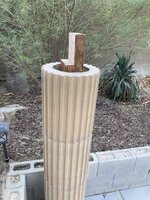
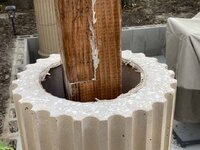
The pillar parts are cast in molds with open tops. A little uneveness of the casting platform, a little capillary action in the fluting of the mold and the open top surface is a bit uneven. So I wrap them in a section of sonotube which is used as an even height reference then set about grinding things. Every concrete piece has a flat square bottom and a rough 'top'. So one face has to be worked, the other used as-is. The way I am arranging / inverting the pieces, I only have to dress 2 joints out of 5, or 4 faces out of 12. Per column. Rest of the joints are flat bottom to flat bottom.

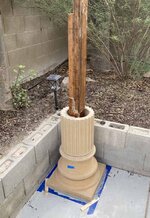
I could have taken greater time in setup and crafted some mold supports which let me cast the pieces in vertical halves, which would have made it easier to assemble the pieces around a full-height post or stanchion. But I was in a hurry to get casting. Project is taking too long as it is. I also was originally going to cast the pieces solid, but weight concerns became a thing, so was casting them hollow. The post solution came after.

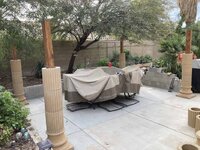
ETA - got greedy and put a 3rd layer in place this afternoon. 5ht pic. Tomorrow the 4th layer of castings goes in place and then the last segment of the posts. Might have it all together by the end of the weekend.
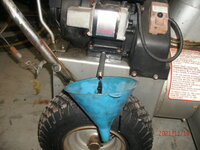
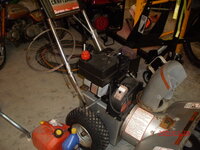
Attachments

  • sparta pergola pillar install 03 pregrind.jpg
    sparta pergola pillar install 03 pregrind.jpg
    110.1 KB · Views: 33
  • sparta pergola pillar install 04 postgrind.jpg
    sparta pergola pillar install 04 postgrind.jpg
    94.4 kb·视图:28
  • sparta pergola pillar install 05 grinding turntable.jpg
    sparta pergola pillar install 05 grinding turntable.jpg
    90.6 KB · Views: 30
  • sparta pergola pillar install 06 second layer.jpg
    sparta pergola pillar install 06 second layer.jpg
    77.3 kb·视图:35
  • sparta pergola pillar install 08 3rd layer.jpg
    sparta pergola pillar install 08 3rd layer.jpg
    106.9 KB · Views: 34
最后编辑:
Kevkx125

Kevkx125

Well-known member
Joined
Dec 26, 2013
Messages
2,642
地点
DOUGLASSVILLE, PA
我开始了吹雪机,并用无乙醇的汽油从坦克上填满了坦克,准备让母猪飞行,希望这个季节不会太多!

Attachments

  • GEDC0863.JPG
    GEDC0863.JPG
    322.9 KB · Views: 40
  • Like
Reactions: 555
rshadd

rshadd

Well-known member
Joined
2009年12月29日
Messages
1,501
地点
Doylestown, PA
Installed a smart outlet in the shop. I'm using it mostly to build out my zigbee mesh network to increase the range for my zigbee contact sensors they I have for the garage doors and trash lids.

2021-11-03 010.JPG

Attachments

  • Enbrighten Zigbee Smart Outlet.JPG
    Enbrighten Zigbee Smart Outlet.JPG
    129.6 KB· Views: 14
rd65

rd65

Well-known member
Joined
Sep 29, 2017
Messages
182
地点
Granite Falls, WA
With another dry weekend coming it should be the last leaf clean up weekend. Got the broken starter cord replaced on the hand leaf blower, cleaned carbs on two chainsaws for some fallen tree clearing, and mixed up some more premix. I hadn't used the saws in over a year and neither would start last monday when I had a hemlock blow down through the fence. Fence in temporarily patched up to keep the hound in but the tree in blocking the path to my leaf dumping area. Going to be a busy weekend. Step daughter's baby shower is at the house sunday afternoon, apparently men are invited these days.
16again

16again

Well-known member
Joined
Nov 25, 2010
Messages
900
地点
Treasure Coast, FL.
2016换机油和轮胎旋转在我的玩具吗ota Camry. Then I found out my home has been sold and as of 12/10 I will be homeless. Not to mention scheduled surgery to rebuild my hand on the 30th of November! FML!!!!
I have a pre approval for new mortgage BUT it doesn't appear that stars will align to work it all out.
R

rayra

Well-known member
Joined
Dec 1, 2014
Messages
1,299
地点
Escaped from Los Angeles
Getting workshop cleaned up and prepared to work the big beams for the pergola project. Havent' yet decided whether I'm using 4x8 or 4x10 beams. Last pillar pieces / capitals go in place Sunday afternoon. Then I'll put up a couple cardboard mockups. Beams will probably have an ogive cutout on the ends. Not sure of the overhang lengths yet. And for various reasons the beams will likely be two pieces with some joinery.
前Ogives的夫妇图片,例如。这些是2x6红木。

grillcounter191.jpg grillcounter196.jpg grillcounter203.jpg

Looking forward to recapitulating a similar design atop the new pergola. Today was the 4th tier of pillar castings and the last section of wood on the posts. Might do the 5th layer late today or early tomorrow. Have a friend slated to help Sunday afternoon to hoist the 120# tops / capitals into place (same as the pillar bases)


eta I went ahead and added teh 5th tier of column pieces late this afternoon.

Attachments

  • sparta pergola pillar install 09 4th layer.jpg
    sparta pergola pillar install 09 4th layer.jpg
    80.2 KB · Views: 20
  • sparta pergola pillar install 10 4th layer.jpg
    sparta pergola pillar install 10 4th layer.jpg
    92.5 KB · Views: 19
  • sparta pergola pillar install 11 last wood.jpg
    sparta pergola pillar install 11 last wood.jpg
    124.7 KB · Views: 19
  • sparta pergola pillar install 12 closeup.jpg
    sparta pergola pillar install 12 closeup.jpg
    81.8 kb·视图:20
  • sparta pergola pillar install 13 5th tier.jpg
    sparta pergola pillar install 13 5th tier.jpg
    129.8 KB · Views: 14
最后编辑:
To avoid these ads,狗万10万提款
Top Bottom
Baidu